Murph’s Famous Bloody Mary Chicken Wings

We’re talking about game day, party food, which means one thing- you need to have chicken wings. If you don’t, your party isn’t really a Super Bowl party. Sorry, but it’s true.

Sure, you could whip up some basic buffalo wings, but don’t you want to stand out a little? Do something a little different? Turn a few heads at your game day party?

If the answer is yes, then there is one simple requirement- a bangin’ Wing sauce. And I’ve you covered.

People- we are talking about combining Bloody Marys and Buffalo Wings! It doesn’t get any better than this! It’s cheap, easy and exactly what you need to score a touchdown at your game day party. Around here, we are big fans of The Murph’s Famous Bloody Mary Mix and using it as a wing sauce is just Bloody Brilliant 🙂

Murph's Bloody Mary

The Ultimate Spicy Crab Dip

Crab Dip

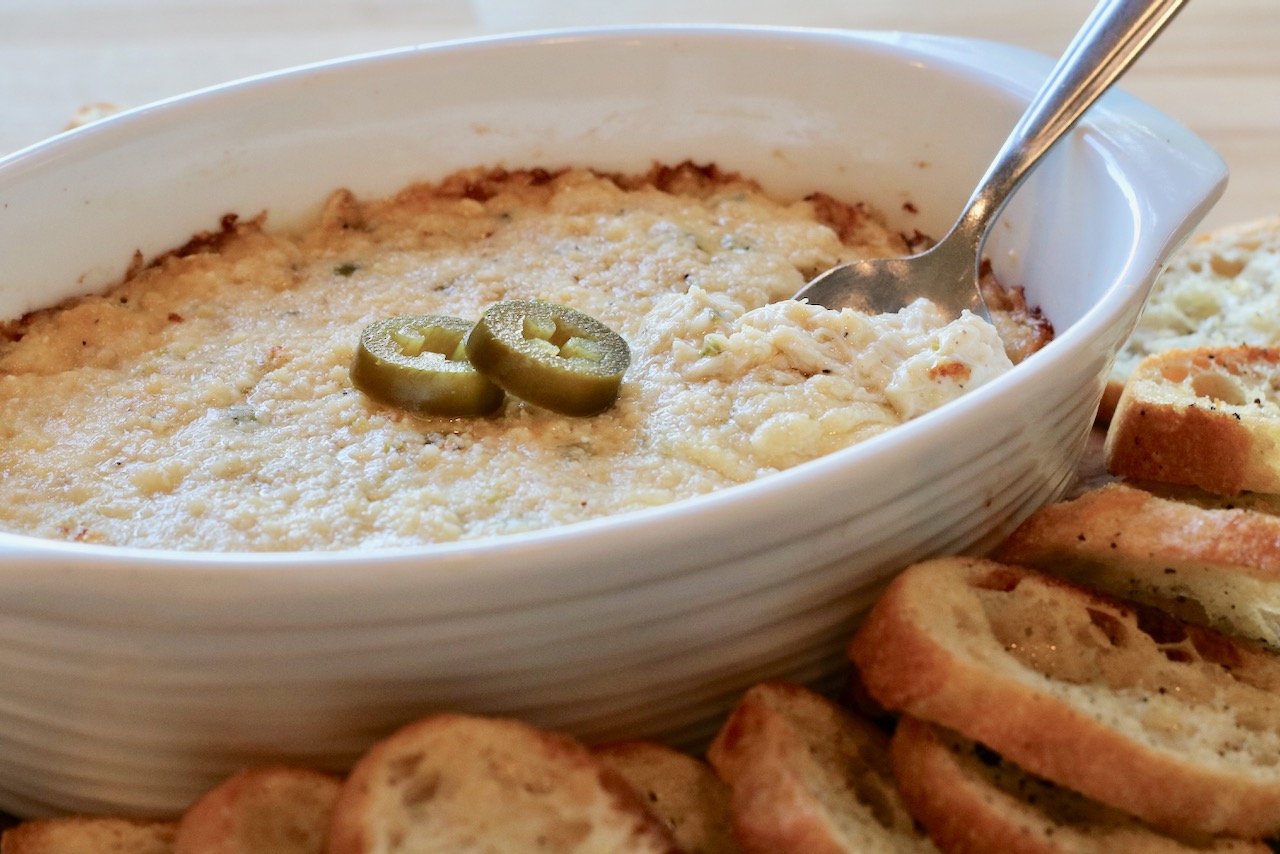
Hot, Spicy & Cheesy Crab Dip

This is, without a doubt, the single most requested recipe I get asked to make by friends and family.

Having tried many crab dip recipes over the years, I can tell you that this is the ultimate Spicy Crab Dip. The recipe is adapted from Emeril Lagassee, to whom I am eternally grateful for creating this easy and delicious dip. I have altered the quantity of some of Emeril’s ingredients, and the directions, to arrive at what I think is crab perfection.  It turns me into a star cook every time.

Ok, lets get down to it.  Selecting your crab.

If you want good crab dip, use good crab. It’s just that simple.

I know this is not always possible for those of you who don’t have access to a good fish shop, but fortunately for me, we have several around these parts- which means fresh crab is the only acceptable option for me. And for that reason alone, I remain a coastal citizen.

Alright, fresh crab- check.

Now, what kind of crab to use? Claw, backfin, lump, jumbo lump. The options are overwhelming! Actually, no they are not.

And so, jumbo lump is the way to go. Nothing makes a feaster more happy than getting a big ole’ meaty lump of fresh crab and only jumbo lump will do that. When jumbo isn’t an option, lump does the job fantastically, and what Emeril calls for in his original recipe, but avoid claw and backfin meat for this recipe. They do have their place in other recipes, but not this one.

Next, picking a hot sauce. When the recipe calls for hot sauce, use hot sauce- not Tabasco sauce, not Sriracha sauce. Got it? They are not the same thing! Tabasco nor Sriracha should ever be used as a substitute for hot sauce and vise versa in a recipe. They have different flavor profiles and their measurements do not equal each other. For example, a tablespoon of hot sauce is not equal to a tablespoon of Tabasco sauce in a recipe. So in order to achieve the desired result for this gem of a recipe, be sure to use a hot sauce like Frank’s Red Hot Sauce or Chilula Original Hot Sauce. 

The rest of the ingredients are pretty straight forward and don’t require much introduction- mayonnaise, garlic, jalapeño jack cheese, pickled jalapeños and parmesan cheese. So there you have it- everything you need to make this amazing crab dip.

But… hold up a second. A dip is only as good as whatever you dip it with. The ‘dip’ and the ‘dipper’ need to be in perfect culinary harmony. So, no crackers, no chips, no vegetables here. This recipe needs homemade toast points.

The toasts used to take me a while to baste each one with just the right amount of olive oil and it was, simply put, a pain in the ass. I’ve since figured out a trick that makes these toasts super easy and quick to make, while also cutting out a few calories. Instead of basting the toasts in olive oil, I simply use a good olive oil spray. It works out brilliantly and I no longer have an excuse not to make them.

Ultimate Spicy Crab Dip

Ingredients

  • 1 lb Jumbo lump or lump crabmeat, picked over for shells and cartilage
  • 1 tsp chopped garlic
  • 1/3 lb Monterey Jack cheese with jalapenos, grated
  • 1 tsp Worcestershire sauce
  • 1 tsp Hot Sauce, such as Franks
  • 1/2 tsp kosher salt
  • 1/2 cup Mayonnaise
  • 1/4 cup diced jarred jalapeños (up to half a cup depending on taste)
  • 2 ounces Parmigiano-Reggiano cheese, grated

Crouton Points

  • 1 French baguette- sliced into 1/4 inch thick slices
  • salt & fresh ground pepper

Instructions

  • Preheat the oven to 350F
  • Combine the garlic, jalapenos, Monterey Jack, Worcestershire, hot sauce, salt, and mayonnaise in a medium-size mixing bowl. Gently mix in the crab.
  • Spoon the mixture into a 9×9 or other medium-size, shallow baking dish. Sprinkle the Parmesan cheese evenly on the top.
  • Bake until golden brown and bubbly, about 25 minutes. Remove from the oven and let sit for about 5 minutes. Serving with the croutons

Crouton Points

  • Preheat the oven to 400°F. Line a baking sheet with parchment paper.
  • Arrange the bread slices on the baking sheet and spray them with olive oil spray and sprinkle with salt and pepper. Flip and repeat.
  • Bake until the croutons are lightly browned, about 6 minutes. Remove from the oven and let cool completely before serving.

Baked Potato Skins

potato skins - game day recipes

The ultimate crowd pleaser

Game day food needs to be easy to make, easy to eat, and above all else, DELICIOUS! So look no further because theses Party Approved Potato Skins are everything you need.

easy potato skins

These one bite potato skins are guaranteed to turn your guest’s eyes away from the TV and straight onto you! But you better be ready because they’ll be looking at you asking for seconds and thirds.

Traditional potato skins are typically hollowed out halves of whole potatoes, loaded with cheese, bacon and served with sour cream. They require a fork and knife to eat and a deep fryer to make. It’s a boat load of work in the average home kitchen. Whereas this recipe serves up all the deliciousness that comes with traditional potato skins, but delivers it in an easy to eat, easy to make, crowd pleasing, single bite! Whomp- there it is!

How to Make Potato Skin Bites

Slice the potatoes in 1/8″ inch rounds, brush on olive oil, sprinkle with salt and pepper, flip, repeat, bake, transfer skins to an oven proof serving platter, top with cheese and bacon, pop back in oven until cheese melts and garnish with scallions and ranch dressing. Serve.

You could get seriously creative with the toppings on these potato bites, but I like to keep it simple.

When it comes to what kind of potatoes to use, I tested out a few different types of potatoes for this recipe and the clear winner was the red skinned potato. It had a much better flavor and consistency than its friends the Russet and The Yukon Gold. Note: When selecting your red potatoes, try to pick ones of similar size. This will help out with plating.

The testing didn’t stop there. I also tested out a few cheeses. I crowned Colby Jack the winner due to flavor profile, the melting quality, and the presentation of blended white and orange color. You can use any good melting cheese you wish, but make sure to grate your own. Pre-shredded cheeses contain unnecessary additives which prevent them from melting well and you want your cheese to melt into ewy-gooey deliciousness.

And if you can believe it- there is something that makes this recipe even better! You can make it in advance!  Simply bake the potatoes as directed, let cool and store until ready for use. They will remain good for at least one day. Prepare all remaining ingredients and store until ready for use. When you are ready to serve, simply assemble, bake and serve. This makes this recipe the ultimate party recipe!

Feasters Tip

You can scale this recipe up or down in quantity based on your needs. The process is the same.  For reference, a sheet pan can hold about 5 red potatoes which feeds about 3-4 people as an appetizer.

Baked Potato Skin Bites

The ultimate game day recipe! 
Prep Time10 minutes
Cook Time30 minutes
Total Time40 minutes
Course: Appetizer

Ingredients

  • red skinned new potatoes
  • olive oil, salt, pepper
  • Colby jack or other good melting cheese
  • fresh bacon bits
  • scallions
  • ranch dressing

Instructions

  • Preheat oven to 400 degrees F.
  • Slice red skinned potatoes in 1/8″ rounds 
  • Brush on Olive oil, sprinkle with salt & pepper. Flip and repeat. Bake for about 25 minutes. Flip and bake for about another 15 until cooked through and browned nicely. 
  • Transfer to an oven proof serving dish (optional) Top with a good melting cheese such as colby jack and fresh bacon bits. Bake until cheese melts. 
  • Top with scallions and ranch dressing. Serve hot. Enjoy!

Notes

You can scale this recipe up or down in quantity based on your needs. The process is the same.  For reference, a sheet pan can hold about 5 red potatoes which feeds about 3-4 people as an appetizer.

How to make the Best Bloody Mary

[vc_row][vc_column][vc_column_text css=”.vc_custom_1518493867883{margin-bottom: 0px !important;}”]We taste a lot of Bloody Marys and we make a lot of Bloody Marys. We know that everyone makes them their own way, and everyone has a secret ingredient. The recipe below is our baseline, go to, simple bloody. You can build anything onto this base and it will handle it.[/vc_column_text][/vc_column][/vc_row][vc_row][vc_column][vc_video link=”https://youtu.be/HZUTIGNNxeo”][/vc_column][/vc_row]

How to serve Bloody Marys to a crowd

bloody-marys-in-mason-jars

Bring on the Bloodys!

I drink a lot of Bloody Marys. I blog about Bloody Marys. I taste test Bloody Mary mixes and review them. I co-founded a Bloody Mary app to help match users to great Bloody Marys. (Did you download it yet? Its free!) So it’s not surprising that I often get put in charge of “Bringing the Bloodys” to just about every occasion amongst our friends and family. We’re talking birthday parties, brunches, game day parties, Sundays because…Sundays. You get the point, right?

Well, I was really frustrated by transporting my Bloody Mary Mix in pitchers that always spilled, had a limited capacity, (which didn’t always cut it) and then to make it worse, I had to either serve them in plastic cups or use what ever the host had for me to work with. Presentation means a lot to me so the cup thing was the final straw. Something had to change if I was going to continue to “Bring the Bloodys.

Then it hit me. The most obvious, simple answer of all time. The classic, the modest, the amazing… The Mason Jar. And lots of them. Serving them this way allows me to make them ahead of time, in individually portioned sizes, ready for drinking. It’s perfect.

It’s all about the Mason Jar…and the lid.

I use mason jars for everything including our everyday drinking glasses, storage of leftovers, precut veggies, prepped ingredients, pantry storage and even crafting and tool supply organization. Understanding and embrasing the versatility of the mason jar has made me more organized, as well as creative, in the kitchen and beyond.

Because I love mason jars and use them for so many thing, I invested in screw on tops and it was one of the best investments I’ve ever made. They are fantastic for everyday use. I purchased 2 sets over 3 years ago, they work super well I don’t need to fumble around with the 2 part sealing lids and bands. (Note- these lids are not intended for canning.)

How to Serve Bloody Marys to a Crowd

  1. In a large pitcher, make your favorite Bloody Mary recipe. (Don’t have a recipe? Try mine.)  Be sure not to include the vodka. The vodka gets to come to the party later.
  2. Pour the Bloody Mary mix into the mason jars until just about half way. Screw on the lids, clean up your mess and put the jars in the fridge. (I put them right back into the box I bought my Mason jars in, which makes storage and/or transportation super easy.) They can stay like this for at least 3 days, probably more.

Ok, lets fast forward. It’s time to serve some Bloody Marys.

First, set up your prep station, or create a build your own Bloody Mary Bar. For either you will need:

  • The pre-filled jars
  • vodka, tequila,or both
  • Ice
  • Straws
  • Garnish(es) of your choice.

Next, put it all together.

  1. Unscrew the lid of a prepared jar, add an ounce of vodka (or two, if you’re feeling spunky.)
  2. Fill the jar with ice.
  3. Screw the top back on and shake! (Sing the song ‘Shake it Baby’ while shaking to encourage laughter at your expense.)
  4. Finally, unscrew the lid, add garnish, insert a straw and serve. Or, don’t do anything and let guests do it themselves.

You are now the hit of the party. And you are welcome.